Custom Workshop Garage Floor Installation Guide
Table of Contents
- Why Custom Garage Floor Installation Matters for Workshops
- Concrete Garage Floor Preparation: The Foundation for Success
- Best Flooring for a Garage Workshop: System Comparison
- Step-by-Step Installation Process
- Epoxy Garage Floor Curing Time and Post-Installation Care
- Slip-Resistant Garage Floor Coating Options
- Common Installation Mistakes to Avoid
- Frequently Asked Questions
Last Updated: October 11, 2026
Why Custom Garage Floor Installation Matters for Workshops
A professional-grade garage floor transforms a workspace from functional to exceptional. The flooring system you choose determines durability, safety, and aesthetics for years to come. Custom workshop garage floor installation protects your investment and supports your activities.
The foundation matters most. A poorly prepared concrete surface will cause any coating to fail, regardless of quality. The concrete must be assessed, repaired, and properly treated before any coating goes down.
Your workshop’s specific demands, chemical exposure, heat, impact risk, and aesthetics, determine how you approach custom workshop garage floor installation.
Concrete Garage Floor Preparation: The Foundation for Success
Preparation determines everything. Premium coatings will peel within months if the concrete isn’t ready.
Moisture Testing and Assessment
Concrete holds moisture. If that moisture escapes after coating, it creates pressure that pushes the coating away from the surface. Testing reveals whether your concrete can accept a coating.
Perform a calcium chloride or relative humidity test before starting. Most epoxy systems require moisture levels below 3 pounds per 1,000 square feet per 24 hours. If your concrete fails, install a moisture barrier or allow extended drying time.
Check for existing coatings or sealers. Old paint, wax, or previous coatings must be removed completely. They prevent new coatings from bonding. Scrape, grind, or chemically strip the surface as needed.
Cleaning and Repair
Remove all dust, dirt, and debris with mechanical cleaning and degreaser. Pressure wash the entire floor and let it dry completely.
Inspect for cracks, spalling, or soft spots. Small cracks can be filled with epoxy; larger cracks need repair compound. Spalled areas must be ground smooth or patched.
Fill any holes or depressions. An uneven floor looks poor and creates puddles. Self-leveling epoxy can correct minor variations, but major dips should be addressed with concrete patching compound before coating begins.
Best Flooring for a Garage Workshop: System Comparison
Three primary systems dominate custom workshop garage floor installation. Each offers different strengths, but the right choice depends on your specific workshop activities, not just cost or cure time.
Epoxy vs. Polyurea vs. Polyurethane
Epoxy is the most popular choice for workshops. It bonds strongly to concrete, resists chemicals and abrasion, and offers excellent color options. Most epoxy systems cure fully in 5-7 days at moderate cost.
Polyurea cures rapidly, walkable within hours, fully usable within 24 hours, at a higher price point. It tolerates moisture better than epoxy and resists UV fading. Polyurea’s heat resistance (stable to 120 degrees Celsius) makes it ideal for welding shops.
Polyurethane sits between epoxy and polyurea in cost and performance. It offers good flexibility and impact resistance, making it suitable for workshops where tools might be dropped.
Matching the System to Your Workshop Type
Vehicle showroom or display garage: Epoxy with a clear or tinted topcoat. Prioritize appearance and UV resistance.
Active mechanical workshop with vehicle lifts: Polyurea or epoxy with a polyurea topcoat. Vehicle lifts concentrate weight on small areas.
Welding or fabrication shop: Polyurea is the best choice. Welding torches generate localized heat that can soften epoxy.
Tool storage and light assembly: Epoxy is sufficient and cost-effective.
Hybrid space (showroom + working area): Epoxy base coat with polyurea topcoat. The epoxy provides chemical resistance and cost efficiency.
Cost and Cure Time Trade-offs
Epoxy is typically 30-40% less expensive than polyurea per square foot, but the longer cure time (5-7 days) may cost you in lost workshop time. Polyurea costs more upfront but returns your space to service within 24 hours. For a workshop generating revenue, the faster return-to-use often justifies the higher material cost.
Choose your coating system based on three factors: (1) chemical exposure (oil, solvents, coolant), (2) heat exposure (welding, hot equipment), and (3) impact risk (tool drops, equipment weight). A system that excels at one may fail at another. If your workshop has multiple demands, a two-coat system (epoxy base + polyurea topcoat) is the most versatile approach.
Step-by-Step Installation Process
The installation itself follows a logical sequence. Each step builds on the previous one.
Surface Grinding and Etching
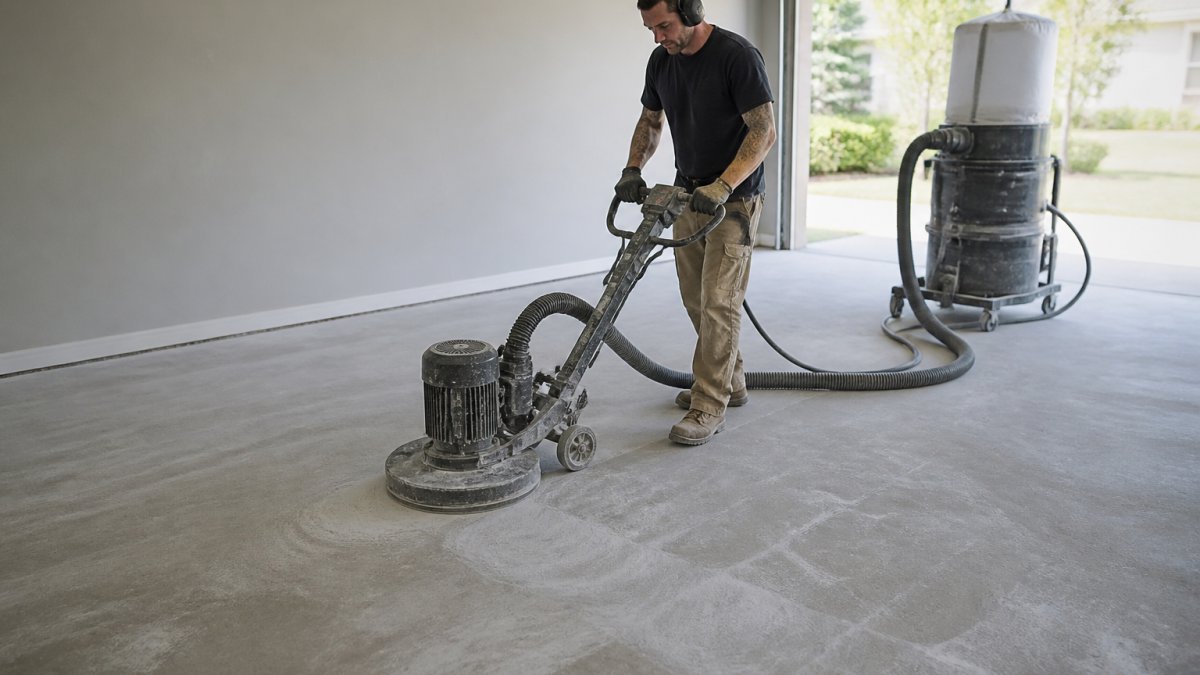
Grinding opens the concrete’s pores for mechanical bonding. Use a concrete grinder with 80-120 grit diamond discs in overlapping passes until the concrete looks dull and uniform.
After grinding, etch the floor with a concrete etching solution per manufacturer’s instructions. Rinse thoroughly and allow to dry completely, typically 24-48 hours.
Primer Application
Primer seals the concrete and creates a base for the coating. Mix per instructions and apply with a medium-nap roller in sections, maintaining a wet edge.
Apply at the manufacturer’s specified rate, typically 150-200 square feet per gallon. Allow to cure fully before applying the base coat, typically 4-8 hours.
Base Coat and Decorative Finish
The base coat provides color and initial protection. Mix thoroughly and apply with a roller in thin, even passes. Avoid puddles or thick spots.
If adding decorative flakes or metallic pigments, broadcast them onto the wet base coat immediately after application. Once the base coat begins to tack, flakes won’t adhere.
After the base coat cures (typically 24 hours), apply the topcoat. This is often a clear protective layer or a tinted coat that provides the final color. Apply it the same way as the base coat, thin, even passes with a roller.
Never apply a second coat before the first has fully cured. Premature coating causes adhesion failure and peeling. Check the manufacturer’s cure time, it varies by product and temperature.
Epoxy Garage Floor Curing Time and Post-Installation Care
Standard epoxy cures to a hard surface in 24-48 hours; full cure takes 5-7 days. Keep the space unoccupied during this period.
Temperature and humidity affect curing. Ideal conditions are 18-24 degrees Celsius with 40-60% relative humidity. Ventilate well to allow moisture to escape.
Once fully cured, maintain the floor with regular cleaning. Sweep or vacuum to remove dust and debris. Mop with pH-neutral cleaner. Avoid harsh chemicals that degrade the coating. Recoat or refresh the topcoat every 3-5 years depending on use and wear.
Slip-Resistant Garage Floor Coating Options
Slip resistance is critical in workshops where spilled oil, coolant, or water creates hazards. However, slip resistance isn’t one choice, it’s a spectrum of options with different durability, appearance, maintenance, and cost implications. The right choice depends on your workshop’s contamination risk and aesthetic priorities.
Broadcast Flake Systems
Broadcast flakes are colored polymer chips applied to the wet base coat immediately after application.
Slip resistance: Moderate to high, depending on flake size and density.
Schedule Your Private Garage Design Consultation →
Durability: Flakes are embedded and don’t wear away. A flake system lasts 5-10 years in active workshops.
Appearance: Flakes come in dozens of colors and can be mixed for custom patterns.
Cost: Flake systems add $1.50-$3.00 per square foot to the base epoxy cost.
Maintenance: Sweep or vacuum regularly to prevent dirt buildup. Mop with pH-neutral cleaner only. The textured surface requires extra maintenance time.
Grit Additives (Broadcast or Mixed-In)
Slip resistance: High. Grit provides consistent, reliable grip across the entire floor.
Durability: Grit is embedded and doesn’t wear away. However, repair patches may not match the surrounding texture.
Appearance: Grit creates a uniform, industrial look. It’s less visually interesting than flakes and shows dust and footprints more readily.
Cost: Grit additives add $1.00-$2.50 per square foot. Less expensive than flake systems but more expensive than smooth epoxy.
Maintenance: Grit traps dirt readily. Vacuum frequently and mop with a stiff brush. Use pH-neutral products only.
Anti-Slip Topcoats
Anti-slip topcoats are applied as the final layer over the base coat, containing aggregate or textured particles for maximum grip.
Slip resistance: Very high. Anti-slip topcoats provide the most aggressive grip of any option.
Durability: Topcoat systems wear over time. High-traffic areas may show reduced grip after 3-5 years.
Appearance: Anti-slip topcoats create a rough, industrial finish. This is a trade-off: maximum safety, minimal aesthetics.
Cost: Anti-slip topcoats add $2.00-$4.00 per square foot. Most expensive of the slip-resistance options.
Maintenance: Rough surfaces trap dirt aggressively. Vacuum and mop frequently. Avoid pressure washing.
Smooth Epoxy with Slip-Resistant Topcoat (Two-Coat System)
Slip resistance: High in treated zones, smooth elsewhere.
Durability: Both layers are durable. The topcoat can be reapplied to high-wear zones without refinishing the entire floor.
Appearance: Polished base coat with textured zones. This creates visual interest and signals where hazards exist.
Cost: Base coat plus selective topcoat application is moderately priced.
Maintenance: Smooth areas are easy to clean; textured zones require more attention. This is manageable if textured zones are limited to 20-30% of the floor.
Choosing the Right Slip-Resistance System
For a custom workshop garage floor installation, match slip resistance to contamination risk:
- Display-only showroom: Smooth epoxy or light broadcast flakes. Slip resistance is a secondary concern.
- Light workshop (hand tools, assembly): Broadcast flakes. Moderate slip resistance with good aesthetics and durability.
- Active mechanical workshop (oil spills, coolant): Broadcast flakes or grit additives. High slip resistance is essential.
- Welding or fabrication shop: Grit additives or anti-slip topcoat. Maximum grip is critical around hot equipment and spill zones.
- Hybrid space: Smooth base coat with anti-slip topcoat in work zones. Balances appearance and safety.
Don’t assume smooth epoxy is unsafe. Smooth epoxy with a matte finish provides adequate grip for most workshops. Slip resistance becomes critical only in spaces with frequent liquid spills or high foot traffic. Assess your actual contamination risk before investing in expensive anti-slip systems.
Common Installation Mistakes to Avoid
Most failures trace back to preparation or application errors.
Skipping or rushing surface preparation is the biggest mistake. Even premium coatings fail on poorly prepared concrete.
Applying coating in improper conditions causes curing problems. Apply coatings within the temperature and humidity ranges specified by the manufacturer.
Mixing errors compromise the coating. Resin and hardener must be mixed thoroughly in the correct ratio.
Applying coats too thick or too thin creates problems. Thick applications cure slowly and bubble; thin applications lack protection.
Failing to allow proper cure time before use is common. Follow the manufacturer’s cure schedule strictly.
The difference between a floor that lasts 10 years and one that fails in 2 comes down to preparation and patience. Rush the prep work or the curing time, and you’ll regret it.
Custom workshop garage floor installation creates a durable, visually striking foundation for your space.
At Lux Garages, we handle every phase of custom workshop garage floor installation, from structural assessment through final topcoat application. Our team ensures proper surface preparation, selects the coating system that matches your specific needs, and manages the installation timeline so your space is ready when you need it. Schedule your private garage design consultation to discuss your project and explore how a custom floor transforms your workshop.
Frequently Asked Questions
How do you prepare a concrete garage floor for epoxy?
Concrete garage floor preparation involves three critical steps. First, test moisture levels using a calcium chloride or relative humidity test, epoxy won’t adhere to damp surfaces. Second, clean the floor thoroughly with a degreaser to remove oil, dirt, and residue. Third, mechanically grind or etch the surface to create texture for coating adhesion. Repair any cracks, spalls, or damaged areas with concrete filler before proceeding. Proper preparation determines whether your flooring system lasts 10+ years or fails prematurely.
What’s the difference between epoxy, polyurea, and polyurethane for garage floors?
Epoxy offers excellent durability, chemical resistance, and affordability. Polyurea cures faster and handles temperature swings better. Polyurethane provides superior UV resistance and flexibility. For workshop environments with heavy vehicle use, epoxy and polyurea are most popular. The best flooring for a garage workshop depends on your climate, budget, and traffic patterns. Consult a professional to match the system to your specific needs.
How long should epoxy cure before parking a vehicle on it?
Epoxy garage floor curing time typically ranges from 24-72 hours for light foot traffic, but full cure for heavy vehicle use requires 5-7 days. Temperature and humidity affect curing speed, warmer, drier conditions accelerate the process. Parking a car too soon can cause soft spots, adhesion failure, or permanent indentation. Always follow your coating manufacturer’s specifications. Professional installers provide a detailed curing schedule that accounts for your local climate and the specific epoxy system used.
Can slip-resistant coatings affect the appearance of my garage floor?
Slip-resistant garage floor coating options include non-skid flakes, textured finishes, and grit additives, all enhance safety without sacrificing aesthetics. Decorative flakes add visual interest and depth, while textured finishes create a professional, industrial look. Modern slip-resistant systems come in multiple colors and patterns, allowing you to customize the finish to match your garage design. The key is balancing safety with appearance.