
Modern Garage Lighting Design Tips for 2026
Last Updated: October 23, 2026
Quick Summary
Modern garage lighting design starts with zoning your space, then matching fixtures to each task. Plan roughly 50 lumens per square foot for general garage lighting and closer to 100 lumens per square foot over a workbench or detail area, using wide-beam LEDs for parking bays and narrower beams for task light.
- Sketch and measure your zones on paper first so your sketch becomes your shopping list.
- A fixture rated at 4,000 lumens means a typical two-car garage needs about six of them.
- Choose a CRI of 90 or higher for workbenches and vehicle care where color accuracy matters.
- Mount workbench fixtures directly overhead, roughly a metre above the surface.
- Plan separate switched circuits for parking, task, accent, and storage lighting zones.
Table of Contents
- Start With a Garage Lighting Layout That Fits How You Use the Space
- How Many Lumens Does Your Garage Actually Need?
- Pick the Right LED Fixtures for Ceilings, Cabinets, and Detail Work
- Garage Task Lighting for Workbenches, Tools, and Vehicle Care
- Garage Lighting Color Temperature and CRI Explained Simply
- Control Glare, Shadows, and Light Placement Around Vehicles
- Modern Garage Lighting Ideas Worth Copying
- Wiring, Safety, and Smart Controls for a Finished Build
- Frequently Asked Questions
Start With a Garage Lighting Layout That Fits How You Use the Space
Good garage lighting starts with a plan, not a shopping cart: decide what happens in each part of the space, then light for those tasks.
Lighting is also a safety matter. The Canadian Electrical Code sets the rules for how fixtures are wired and where they can go, so your layout has to work with those limits, not against them.
Map Your Zones Before You Buy a Single Fixture
Zones are the backbone of any garage lighting layout. Each zone gets its own fixtures and its own brightness level. Most garages need four:
- Parking bays: even overhead light with no harsh glare on paint
- Workbench and tool wall: bright, focused task lighting
- Storage and cabinets: light that reaches into shelves and corners
Sketch and measure your zones on paper first. That sketch becomes your shopping list and stops you from overbuying fixtures.
Put your brightest fixtures over the workbench, not over the car. Paint and chrome bounce light back at you, and a bright fixture directly above a hood creates glare that hides detail.
How Many Lumens Does Your Garage Actually Need?
Lumens measure light output, and they matter more than wattage when you shop for LED fixtures. A simple starting point is roughly 50 lumens per square foot for general garage lighting, and closer to 100 lumens per square foot over a workbench or detail area.
Here is how that math works in practice for a typical two-car garage of about 400 square feet:
| Zone | Size | Target brightness | Rough lumen total |
|---|---|---|---|
| General parking area | 300 sq ft | 50 lumens/sq ft | 15,000 lumens |
| Workbench zone | 60 sq ft | 100 lumens/sq ft | 6,000 lumens |
| Storage and cabinets | 40 sq ft | 50 lumens/sq ft | 2,000 lumens |
Add those numbers up for a whole-room target, then divide by the output of the fixtures you like. A fixture rated at 4,000 lumens means you need about six of them.
Pick the Right LED Fixtures for Ceilings, Cabinets, and Detail Work
LED fixtures win on almost every count: long lifespan, low wattage, and no warm-up time in a cold garage. The question is which type goes where, and how to read the specs that matter.
Match the Fixture to the Zone, Not Just the Ceiling
A common mistake is buying one fixture type for the whole room. Modern garage lighting design works better when each zone gets a fixture that suits its job:
- Parking bays: linear LED fixtures or flat panels with a wide beam angle (roughly 100 to 120 degrees) for even general lighting. Wide beam spreads light across the floor and softens hotspots on paint.
- Workbench and tool wall: a dedicated linear fixture or adjustable arm lamp with a narrower beam (roughly 60 to 90 degrees) so light lands on the work surface instead of spilling into the room.
- Under-cabinet lighting: slim LED strips or tape lights tucked beneath upper cabinets. Look for a high CRI rating and a diffused cover so you do not see individual LED dots reflected on a counter or shelf.
Read the Specs That Matter in a Garage
Fixture shopping pages are full of numbers. These are the ones that change how a garage feels:
- Lumens per watt: a higher number means less power for the same light, so compare before you buy.
- Beam angle: a wide beam (100 to 120 degrees) suits general lighting; a narrow beam (60 to 90 degrees) suits task lighting. A very narrow spot beam creates harsh pools of light and deep shadows between fixtures.
- CRI: choose 90 or higher for workbenches and vehicle care, where color accuracy matters.
Skip Old Fluorescent Fixtures Where You Can
Fluorescent tubes hum, dim in the cold, and contain mercury, which complicates disposal. If you are replacing them, measure the existing fixture length and mounting points so a linear LED retrofit covers the same footprint without new drywall work.
No-Wiring Options Have a Place
For a rental or quick upgrade, plug-in LED strips work well, though they add visible cords and outlets, so plan the route before you stick anything to a wall. For a permanent build, wired fixtures give you cleaner lines, better dimming, and fewer things to unplug.
Before you buy, tape the fixture footprint on the ceiling with painter’s tape. Stand where you will work and look up. If the tape line puts a bright source in your line of sight, shift it. A five-minute tape test saves a return.
Garage Task Lighting for Workbenches, Tools, and Vehicle Care
Task lighting lands exactly where your hands are working, the difference between squinting at a bolt and seeing it clearly.
For a workbench, mount a fixture directly overhead, roughly a metre above the surface. For tool walls and pegboards, a strip light along the top edge throws light down over every tool.
A common mistake is relying on one big ceiling fixture for everything. It lights the floor well and the bench badly.
Garage Lighting Color Temperature and CRI Explained Simply
Color temperature describes how warm or cool a light looks, measured in kelvin. Color rendering index (CRI) measures how accurately a light shows true colors, up to 100.
Schedule Your Private Garage Design Consultation →
For a garage, aim for 4000K to 5000K, which reads as clean and neutral, close to daylight, without the blue cast of very cool bulbs.
Keep color temperature consistent across the room. Mixing warm and cool fixtures in one space looks sloppy, and it makes photos of your car look off.
Control Glare, Shadows, and Light Placement Around Vehicles
Glare and shadows are the two problems most lighting plans ignore. Both come down to fixture placement.
Glare happens when a bright source sits in your line of sight or reflects straight back off a glossy surface.
Shadows form wherever a fixture is blocked by the car, a cabinet, or you. The fix is overlap: space fixtures so each covers part of the next one’s area, and keep them at least half a metre from walls so light washes down instead of leaving dark corners.
Mounting a fixture directly over a vehicle hood or roof creates a mirror-like reflection that hides dents and scratches. Offset the fixture or use a wider beam so light hits the surface at an angle.
Modern Garage Lighting Ideas Worth Copying
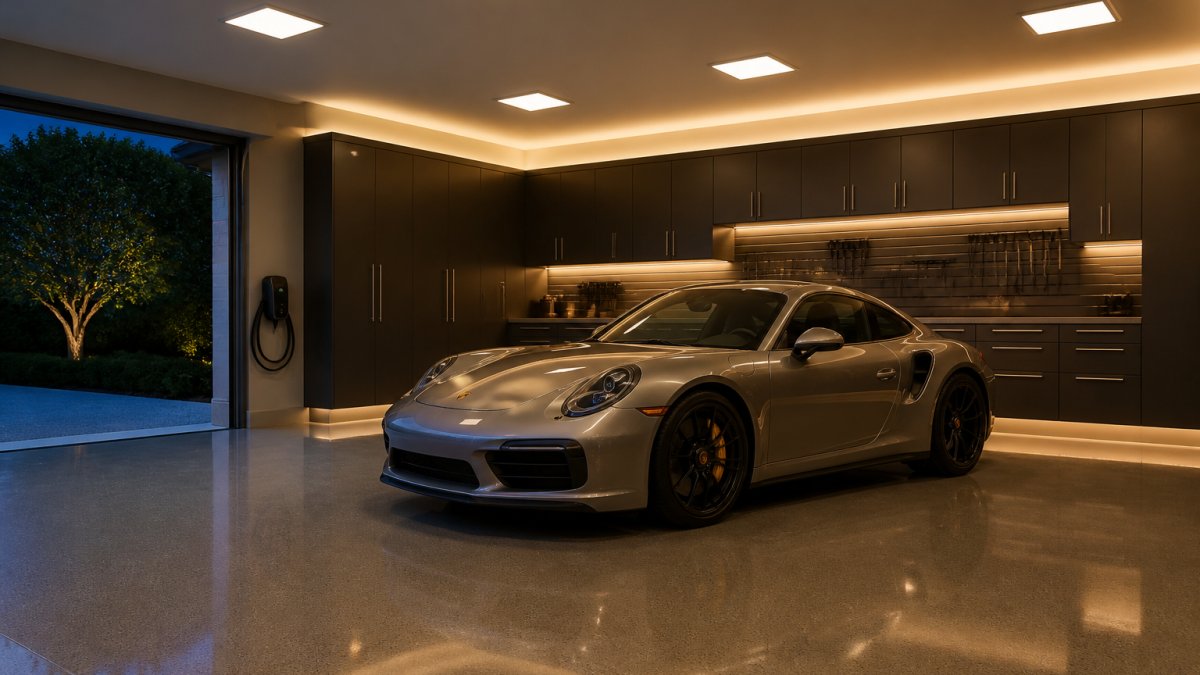
Here are garage lighting ideas that hold up in real spaces, not just photos:
- Linear ceiling grid: a row of slim LED fixtures running the length of the garage for even illumination
- Toe-kick accent strips: a low strip along the base of cabinets that makes the floor seem to float
- Hexagon lights: a feature wall of linked hex panels for a workshop or display corner
The trick is restraint: pick two or three ideas and do them well. A garage with one clean ceiling grid and a lit workbench looks better than one with fixtures everywhere. For a deeper look, our garage showroom and workshop design guide walks through the full design.
Wiring, Safety, and Smart Controls for a Finished Build
Wiring is where a lighting plan either becomes a finished build or a tangle of extension cords. Garages are damp, dusty places, so fixtures and outlets need ratings that suit the environment. In Canada, that means working to the Canadian Electrical Code and pulling a permit where your municipality requires one. A licensed electrician should handle anything behind the drywall.
When to Call a Qualified Electrician
A simple rule: if the work involves opening a panel, running new cable through walls, adding a circuit, or connecting to permanent wiring, call a licensed electrician. Many jurisdictions also require a permit for new circuits and garage work, and an electrician can tell you what your municipality requires. Plug-in and battery-powered fixtures are the usual exceptions, but even those should not overload an existing outlet.
Plan Circuits by Zone, Not by Room
A single switch for the whole garage forces you to light every corner to find one tool. Plan separate switched circuits for the main zones:
- General parking lighting on its own switch or dimmer
- Workbench and task lighting on a dedicated switch so it can run alone
- Accent and toe-kick lighting on a dimmer for evening use
Separate circuits also make smart controls easier to add later, because each zone can become its own controlled group.
Choose Fixtures Rated for the Environment
Garages see temperature swings, dust, and occasional dampness. Look for fixtures rated for damp locations, and wet-location ratings where a fixture is exposed to direct moisture. Sealed or gasketed fixtures resist dust better and are easier to wipe down. If the garage is unheated, check the cold-weather starting rating, since some LEDs are slower to reach full output in low temperatures.
Smart Controls Worth Planning For
Smart controls are practical in a garage because they solve real problems: lights left on, hands full, and one room that needs to serve work and relaxation.
- Motion sensors so lights come on when you walk in and turn off after you leave. Look for a sensor with an adjustable timeout and sensitivity so it does not trigger every time a car passes.
- Occupancy controls for storage and walkway zones, where lights are needed briefly and often.
- Dimmable circuits so one room can serve bright task work and softer evening use. Confirm the dimmer is compatible with the LED fixtures you choose.
Keep the Controls Simple Enough to Use
A control system only saves energy if people use it. Label the switches, keep a manual override for every zone, and avoid burying the main lighting behind an app. The best setup lets you walk in, hit one switch, and get the light you need, with the smart layer doing the rest.
If you want integrated audio, Wi-Fi coverage, or security tied into the same system, our garage technology options show what’s possible. When you’re ready to plan the wiring and lighting together, contact our team to start the conversation. You can also browse our lighting and electrical services to see how a full layout comes together.
Do not daisy-chain multiple high-output LED fixtures on a circuit sized for the old fluorescent load without checking the total draw. LED fixtures use less power, but a large array can still add up, and the circuit and switch must be rated for the combined load.
Frequently Asked Questions
How many lumens do I need for garage lighting?
A single-car garage generally needs around 5,000 to 8,000 lumens spread across the ceiling, while a double garage often needs 10,000 to 20,000 lumens depending on ceiling height and how much detail work happens there. The practical rule is roughly 50 to 75 lumens per square foot for general use, and closer to 100 lumens per square foot over a workbench or detailing bay. Measure your floor area, multiply, then divide by the lumen output printed on each fixture’s box to get a fixture count. Add 20 percent if your walls are dark or your ceiling is above 3 metres.
What is the best garage lighting color temperature?
Most modern garages look best between 4000K and 5000K. That range reads as clean white light without the blue cast of 6500K, and it keeps paint, epoxy floors, and vehicle finishes looking close to their true color. Choose 3000K to 3500K in a lounge-style or showroom zone where you want warmth, and reserve 5000K for workbenches and detailing areas where you need to spot swirl marks and dust. Keep one temperature across the main ceiling grid so the space does not look patchy, then vary it only in accent and task zones.
Where should lights be placed in a garage?
Place ceiling fixtures in rows that run parallel to the garage door, not straight down the middle of the bay. Two or three rows spaced evenly across the width give more even illumination and fewer shadows around parked cars. Keep fixtures roughly 60 to 90 cm out from the side walls so light washes the cabinets rather than landing behind you. Position task lights directly above workbench surfaces and under wall cabinets, and avoid putting a fixture directly above a car hood where it will throw glare off the windshield and paint.
How can I light a garage without adding new wiring?
Plug-in LED shop lights, linkable tape lights, and rechargeable motion-sensor bars all work without opening a wall. Many LED fixtures come with a standard plug and a daisy-chain connector, so you can run several from one existing outlet. Battery puck lights suit storage cabinets and dark corners. If your garage door opener has a built-in outlet, that is often the easiest power source for a ceiling fixture. For anything beyond a few plug-in units, have a licensed electrician confirm the circuit can carry the load before you add more.
