Prevent Epoxy Garage Floor Cracking: A Step-by-Step Guide
Table of Contents
- Why Epoxy Garage Floors Crack: Understanding the Root Causes
- Step 1: Inspect and Assess Existing Cracks Before Installation
- Step 2: Repair Concrete Cracks Before Epoxy Flooring
- Step 3: Complete Epoxy Garage Floor Preparation
- Can Epoxy Cover Concrete Cracks and Joints?
- Step 4: Control Temperature and Curing Conditions
- Step 5: Prevent Future Cracking Through Maintenance and Monitoring
- Common Mistakes to Avoid When Installing Epoxy Floors
- Frequently Asked Questions
Last Updated: October 19, 2026
Why Epoxy Garage Floors Crack: Understanding the Root Causes
Epoxy garage floor coatings are durable and attractive, but to prevent epoxy garage floor cracking, you must address concrete movement and existing cracks. The most common reason epoxy floors crack is that the slab itself cracks, and the coating follows that movement.
Your concrete garage floor is not static. It shifts with temperature swings, humidity changes, and freeze-thaw cycles, stressing any coating on top. If that stress exceeds what the epoxy can handle, the coating cracks too.
Structural Cracks Versus Shrinkage and Hairline Cracks
Not all cracks are equal, and your repair strategy depends on the crack type.
Structural cracks run deep through the slab, indicating real movement from settling, load-bearing stress, or ground movement. They are wide (typically over 3mm) with jagged edges.
Shrinkage cracks are thin and shallow, forming when concrete dries and contracts.
Hairline cracks are the thinnest, barely visible, and often appear in the first few weeks after pouring.
The key difference: structural cracks keep moving. Shrinkage and hairline cracks typically stabilize once the concrete has fully cured.
Concrete Movement, Temperature Changes, and Freeze-Thaw Cycles
Concrete expands when warm and contracts when cold; a 20-degree Celsius swing can move a slab enough to stress an epoxy coating. Repeated freeze-thaw cycles weaken concrete and cause new cracks.
Water enters tiny pores in concrete; when it freezes, it expands and exerts pressure from inside.
Moisture is the enemy. Concrete that absorbs water swells slightly, putting pressure on the epoxy from underneath. If the coating is too rigid or hasn’t bonded properly to a damp slab, it will peel or crack.
Step 1: Inspect and Assess Existing Cracks Before Installation
Before applying any epoxy, inspect your slab thoroughly: identify every crack, measure it, and assess whether it’s active or stable. This determines your repair strategy.
Walk the floor in bright daylight or with a flashlight. Look for cracks of any width, spalled or chipped areas, discoloration that might indicate moisture, and unevenness where concrete has settled. Mark each crack with chalk or tape.
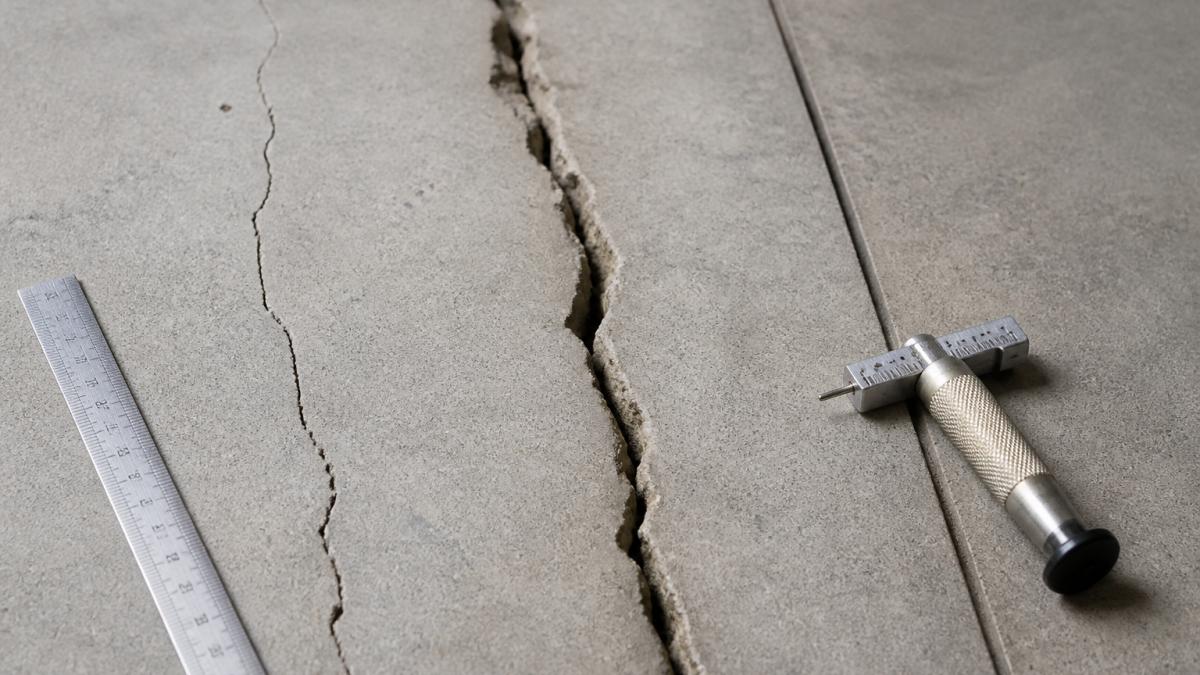
Measuring Crack Width and Depth
Crack width tells you how serious the problem is. Use a crack width gauge or feeler gauge, inserting it into the crack until it stops, and record the width in millimeters.
- Hairline cracks: less than 0.5mm
- Narrow cracks: 0.5mm to 3mm
- Wide cracks: 3mm to 6mm
- Very wide cracks: more than 6mm
Crack depth is harder to measure but equally important. Insert a thin wire as far as it goes, mark where it stops, then measure. Cracks deeper than 25mm indicate structural movement and require professional assessment.
Cracks wider than 3mm or deeper than 25mm should be professionally evaluated before you proceed with epoxy. These may indicate foundation issues or ongoing slab movement that epoxy alone cannot fix.
Concrete Moisture Testing and Adhesion Concerns
Moisture beneath an epoxy coating is a silent killer. Epoxy bonds to concrete chemically, but water interferes with that bond, so a damp slab will eventually peel or blister.
Test moisture with a concrete moisture meter (under $100 CAD at hardware stores) at several points across the floor. Most epoxy manufacturers require moisture below 4% before application.
If your slab is damp, wait for it to dry naturally or use a moisture barrier primer before applying the epoxy.
In basements or high-humidity areas, moisture testing is non-negotiable. Poor adhesion from moisture is the most common reason epoxy fails within the first year.
Step 2: Repair Concrete Cracks Before Epoxy Flooring
This is the critical step most homeowners skip. Do not apply epoxy over cracks; repair them first. A properly repaired crack holds the epoxy coating and prevents future failure.
Crack Injection and Epoxy Repair Compounds
For structural cracks wider than 3mm, crack injection is standard: a professional injects two-part epoxy or polyurethane resin under pressure, filling the entire depth and bonding both sides.
This requires specialized equipment and training. It’s not a DIY job.
For narrower cracks (0.5mm to 3mm), use a crack filler or sealant applied with a caulking gun. It won’t bond as strongly as injected epoxy, but it fills the space and blocks moisture.
Common repair compounds include:
- Epoxy crack fillers: strong bond, longer curing time
- Polyurethane sealants: flexible, faster curing
- Concrete caulk: easier to apply, moderate durability
- Hydraulic cement: fast-setting, good for active leaks
Choose a product rated for concrete repair and compatible with your epoxy coating. Some epoxy coatings bond poorly to certain sealants, so check compatibility before you buy.
Filling and Bonding Techniques for Structural Integrity
Proper filling technique matters: an incompletely filled crack becomes the weak point where the epoxy eventually cracks.
For hairline and shrinkage cracks:
- Clean the crack with a wire brush or vacuum to remove dust and debris
- Use a concrete cleaner to remove oily residue
- Allow the crack to dry completely
- Apply the filler or sealant with a caulking gun, overfilling slightly
- Smooth with a putty knife while wet
- Cure per the product instructions before sanding
For wider structural cracks, a professional will:
- Widen the crack with a concrete saw to create a V-shaped groove (this improves bonding)
- Clean thoroughly with compressed air and a wire brush
- Apply a concrete primer or bonding agent to the crack surfaces
- Inject epoxy resin under pressure to fill the entire depth
- Cap the surface with a concrete patching compound if needed
- Sand smooth once cured
The goal is a solid bond between the concrete on both sides of the crack. If the repair is weak or incomplete, the epoxy coating will eventually fail at that point.
Step 3: Complete Epoxy Garage Floor Preparation
After cracks are repaired, the concrete surface must be thoroughly prepared. This is where most DIY attempts go wrong. Poor surface preparation is the leading cause of epoxy coating failure.
Surface Cleaning, Grinding, and Control Joint Management
Cleaning removes dirt, oil, dust, and residue that prevent bonding.
Grinding opens the surface to accept epoxy by removing the top layer and exposing fresh concrete.
Professional grinding creates a surface profile that epoxy can grip. Most epoxy manufacturers specify a concrete surface profile (CSP) rating, typically CSP 2 or 3 for garage floors.
Control joints are intentional cuts in concrete that allow the slab to move without cracking randomly.
Schedule Your Private Garage Design Consultation →
Do not fill control joints with epoxy. The joint must remain flexible. If you seal it solid, the concrete will crack elsewhere when it moves.
Can Epoxy Cover Concrete Cracks and Joints?
Many homeowners ask: can I just apply epoxy over the cracks and joints? The answer is nuanced.
Epoxy can conceal cracks visually, but it cannot fix them. A thin epoxy coating over an active crack will eventually crack too.
Thin epoxy coatings (less than 2mm) are especially vulnerable. They lack the thickness to bridge small cracks and flex with concrete movement.
For hairline cracks and shrinkage cracks, a properly applied epoxy coating can cover them indefinitely if:
- The cracks are not active (they’ve stabilized)
- The concrete is dry and properly prepared
- The epoxy is applied at the correct thickness
- The coating is properly cured before use
For control joints and wide structural cracks, the epoxy must be designed to accommodate movement.
The bottom line: to prevent epoxy garage floor cracking, repair active cracks before applying epoxy. Do not rely on the coating to fix structural problems.
Step 4: Control Temperature and Curing Conditions
Temperature and humidity during installation directly affect how well epoxy cures and bonds; poor conditions lead to weak coatings that fail prematurely.
Installation Timing and Environmental Controls
Temperature matters. Most epoxy coatings cure best between 15°C and 25°C. Outside this range, curing slows dramatically or fails entirely. In cold weather, epoxy may not harden properly.
Never apply epoxy when:
- The concrete temperature is below 10°C
- The air temperature will drop below 10°C within 24 hours of application
- Humidity is above 85%
- Rain is expected within 48 hours
In colder climates, plan your epoxy installation for late spring or early fall when temperatures are stable.
Humidity control is equally critical. High humidity slows curing and can trap moisture, causing blistering later.
Concrete temperature (not just air temperature) must be measured. Concrete stays cooler than the air, especially in spring.
Curing time varies by product. Most epoxy coatings require 24 to 48 hours of undisturbed curing before light foot traffic is safe.
Step 5: Prevent Future Cracking Through Maintenance and Monitoring
Once your epoxy coating is cured and in use, ongoing maintenance prevents future problems.
Regular inspection catches problems early. Walk your floor monthly and look for:
- New cracks in the epoxy
- Peeling or blistering at edges or seams
- Discoloration or staining that might indicate moisture
- Areas where the coating feels soft or sticky
Small issues are easy to fix. Large failures are expensive.
Moisture monitoring is especially important in basements or areas with high humidity. If you notice moisture or condensation, investigate the source.
Avoid harsh chemicals that degrade epoxy. Use pH-neutral cleaners only. Avoid acetone, strong solvents, and acidic cleaners.
Manage thermal stress. In extreme heat, epoxy can soften. Avoid parking hot vehicles directly on the coating immediately after driving.
Recoat when needed. Epoxy coatings wear over time. Heavy-use garages may need recoating every 5 to 7 years.
Common Mistakes to Avoid When Installing Epoxy Floors
Learning from others’ mistakes saves time and money.
Skipping crack repair. This is the biggest mistake.
Poor surface preparation. Rushing through cleaning and grinding leads to weak adhesion.
Using incompatible products. Not all crack fillers work with all epoxy coatings.
Ignoring moisture. A damp slab under epoxy leads to peeling and blistering.
Over-thinning the epoxy. Adding solvent to make epoxy easier to apply weakens the coating.
Preventing epoxy garage floor cracking starts before you ever apply the coating.
At Lux Garages, we handle every step of this process with professional precision.
The difference between a floor that fails in two years and one that lasts a decade comes down to preparation and attention to detail. We don’t cut corners. Learn about concrete surface preparation standards to understand why this step matters so much, and review epoxy application guidelines for technical specifications.
Transform your garage into a space you’re proud to use.
Frequently Asked Questions
Why does epoxy garage floor cracking happen even with professional installation?
Epoxy coating is only as stable as the concrete beneath it. If the concrete slab moves due to temperature changes, freeze-thaw cycles, or moisture, the epoxy coating follows. Structural cracks, expansion joints, and control joints can all cause epoxy to peel or crack if not properly sealed and repaired beforehand. Professional installation prevents many failures, but concrete movement is inevitable in certain conditions; proper repair before coating and controlling curing conditions minimize this risk.
Should you repair concrete cracks before epoxy flooring?
Yes. Repairing concrete cracks before epoxy flooring is essential. Hairline and shrinkage cracks should be filled with appropriate repair compounds; structural cracks may require epoxy injection for long-term stability. If cracks are left unfilled, epoxy coating will follow the crack path, leading to adhesion failure and peeling. Surface preparation including crack repair restores concrete structural integrity and ensures the epoxy bonds properly to a stable base.
Can epoxy cover concrete cracks and joints?
Epoxy can adhere over small hairline cracks if they’re clean and properly prepared, but it cannot bridge active movement. Expansion joints and control joints must be sealed with flexible sealants before epoxy application to allow the concrete to move without tearing the coating. If joints or cracks continue to move after coating, the epoxy will eventually peel or crack. Professional epoxy garage floor preparation addresses joints and crack movement before installation.
How does temperature affect epoxy floor cracking during installation?
Temperature and humidity during epoxy application and curing directly affect coating adhesion and cure speed. Extreme cold slows curing and can trap moisture; extreme heat accelerates curing and may cause uneven hardening. Most epoxy systems require installation between 15-25°C with humidity below 85% for proper bonding. Installation outside these conditions increases the risk of coating failure, adhesion loss, and premature cracking. Professional installers control environment and timing to meet these standards.